Thursday, 21 February 2013

Systems 1&2 Practice Questions

Systems and Control - Practice Questions

Here are some extra questions to help you with Outcome 1 and 2 in the lead up to your NAB.  If you click on picture for the first question you can scroll through the pictures without seeing the answers. That way you can write your own answers and then check it later.


a) Closed loop control (continuous)
b) Negative Feedback
c) Error detector - to compare the actual temperature to the set temperature and send a signal to the control.  i.e. if the temperature is higher than the set level then a negative signal will be sent to the control, if the temperature is lower than the set level then a positive signal will be sent.
d) The desired temperature is set by the user.  The error detector then compares this set level to the actual temperature in the oven, sensed by the temperature sensor.  If it is too cold the error detector will send a positive signal to the control which will turn on the oven to heat up.  When it reaches the correct temperature there will be no difference between the set temperature and the sensed temperature and so the error detector will send a 0 signal to the control which will switch off the oven.  If it is too hot then the sensed temperature will be higher than the set temperature and the error detector will send a negative signal to the control which will keep the oven off.  This system of constantly monitoring the temperature will mean that the oven will maintain a constant temperature.
e) Thermistor


a) Open Loop Control
b)


a) Sequential Control - A series of events happen one after the other.  The end of one event signals for the start of the next.  So the green traffic light switching off will send the signal to switch on the amber light.

b) Continuous Control - This is a system where the input (temperature sensor) is sending information into the system all the time and the outputs (heater) are being controlled all of the time.  A change in the input directly results in a change in the output. In this example if it is sensed to be too hot, the heater will turn down, if it is sensed to be too cold the heater will be turned up, maintaining a constant temperature.

c) On/Off Control - The system can only ever be in one state: on or off, and nothing in between. This is the type of control used in the conveyor belt.  It will keep moving until a box is sensed and then the motor will switch off, stopping the belt.

Wednesday, 10 October 2012

Mechanisms

Here are the extra notes I gave you in dealing with moment in beams with two pieces, and in calculating hinge reactions in beams with a bend.  I have also put up the two mini tests and their answers to help you.


Tuesday, 25 September 2012

Mechanisms

Here is an interesting Mechanisms website you could look at to see some of these mechanisms in action:

http://www.robives.com/mechs

Monday, 10 September 2012

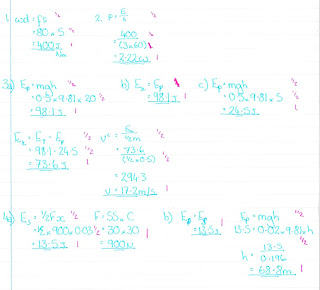
Here is the mini test from today on Energy.

The answers and marking scheme are:


Thursday, 26 April 2012

Stepper Motors

Stepper motors are motors which turn due electromagnetic coils pulling the axle round in a circle.  There is an amination of this on this website:

Stepper Motor

This is useful for two reasons: you can make the stepper motor turn to a particular position and it has a "holding torque" meaning that as long as two of the magnets are energised it can hold something in position.

To make the stepper motor turn you must use a particular pattern to make sure that the coils energise in a circle.  To make the stepper motor turn clockwise you type the pattern in as seen, to make it turn anticlockwise you simply use the same pattern but in reverse:

i.e.

symbol delay = b0
let delay = 100

clock: let pins = %10100000
           pause delay
           let pins = %10010000
           pause delay
           let pins = %01010000
           pause delay
           let pins = %01100000
           pause delay
           goto clock

anti:    let pins = %01100000
           pause delay
           let pins = %01010000
           pause delay
           let pins = %10010000
           pause delay
           let pins = %10100000
           pause delay
           goto anti

Repeating like this will simply make the stepper motor turn continuously.   By using b0 as the delay, we can quickly change the speed of the stepper motor by changing the value of "delay"  The smaller the number the faster the motor will turn, but if you try to turn too quickly the magnets will not have time to pull the axle round so it may not turn at all.

To make the motor turn to a specific position, we must use a FOR . . . NEXT . . . loop.  This will allow us to repeat the pattern a set number of times.  Each line of the program is 7.5 degrees, so each 4 line pattern is 30 degrees.  Therefore to turn one complete revolution we must repeat the pattern 12 times.

i.e.

symbol counter = b0
symbol delay = b1
let delay = 100

clock: for counter = 1 to 12
                  let pins = %10100000
                  pause delay
                  let pins = %10010000
                  pause delay
                  let pins = %01010000
                  pause delay
                  let pins = %01100000
                  pause delay
            next counter


The stepper motor requires a 12v supply and the microprocessor can only supply a 5v signal.  Therefore we must use an external power supply (a black box) to connect to our output driver.

Speed Control - Pulse Width Modulation

Because the microprocessor gives a digital signal out - either 5v or 0v and nothing in between, we must use Pulse Width Modulation (PWM) to control the speed of a D.C. motor.

This uses the Mark to Space ratio to vary the speed - that is the time a motor is on for (Mark) and the time the motor is off for (Space).  This is in order of milliseconds so that it happens so quickly you can't see the pulse, only a constant speed.


Examples of the programs required for these graphs:

green: high 7                                             blue: high 7
           pause 20                                                  pause 10
           low 7                                                        high 7
           pause 10                                                  pause 20
           goto green                                               goto blue

Because the motor is on longer than it is off in the green graph, this is the program which will make the motor turn faster.  You can increase the mark to space ratio to get a bigger difference in speed.

Turning a flowchart into a PBASIC program

A flowchart is the planning stage for a program.  It is important to use the correct shaped box so that it is clear when you are controlling an output, or asking a question etc.  The flowchart is to help you understand the sequence so it is written in English.

The first flowchart is to practice asking about the condition of an input:


First you must choose which pins you are going to use as outputs and which as inputs.  Looking at the board you know that pin 7 is a red LED and 5 is a green LED. I'm going to use pin 0 as my switch.

So I need to tell the microprocessor this:

init: let dirs = %10100000     'Sets pin 7 and 5 as outputs
       symbol green = 5
       symbol red = 7

Now I can write my main program.  If I want to use English words, I must first of all tell the microprocessor this as well by setting the English words as symbols.  If you prefer not to do this, use the black commands, if you would like to do this, follow the purple programming language.

To ask a question I need to use an IF . . . THEN . . .  statement in relation to my input pin.  Then I need to tell the microprocessor which bit of program to go to when my input is on, and when it is not.  If the statement is not true, it will not go to the label which follows THEN but to the next line instead.

main: if pin0 = 1 then green_on       'Check the input pin, if it is on, go to the
                                                                    'green_on sub-procedure.
          goto red_on                            'If the input pin is off, go to the
                                                                    'red_on sub-procedure

red_on: high 7           high red          'Switch on the red LED
             low 5            low green        'Switch off the green LED
             goto main                             'Loop back to the start to test the input

green_on: high 5        high green      'Switch the green LED on
                 low 7         low red          'Switch the red LED off
                 goto main                        'Loop back to the start to test the input


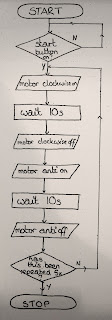
The second flowchart incorporates testing an input and using a counter loop.  To repeat something a certain number of times, you must use a temporary memory file in the RAM to store the number of times the loop has been repeated.  Often we will use b0 for this purpose.  Again, if you want to call b0 something in English you must use the symbol command.

The PBASIC language required to repeat a sequence is a FOR . . . NEXT loop.  For must go at the top of the sequence and next at the bottom.  Anything you write in between FOR and NEXT will be repeated.

Motors, as described earlier in the blog, must be connected using the push-pull driver on the output driver.  7&6 control one motor, and 4&5 control another motor if you require it.  It is important to use the correct pairing to ensure that your motor will turn.

The program for this flowchart would therefore be:

init: let dirs = %11000000             'sets 7 and 6 as outputs
       symbol counter = b0

main: if pin0 = 0 then main     OR    main: if pin0 = 1 then motor   'both of these statements check
                                                                    goto main                       the input.
motor: for counter = 1 to 5           'Starts the loop to repeat 5 times
              high 7                              'motor clockwise on
              pause 10000                    'wait 10 seconds
              low 7                               'motor clockwise off
              high 6                              'motor anticlockwise on
              pause 10000                    'wait 10 seconds
              low 6                               'motor anticlockwise off
          next counter                        'If it has not been repeated 5 times, loop back to motor
          end


The third flowchart is in two parts.  This shows that the sequence uses a sub-procedure.  Where "alarm" is in the main flowchart, it means that the whole of the alarm flowchart fits into that box.  So from the main flowchart, the sequence goes to the start of alarm, and at the end of alarm it returns to the main program and follows the arrow back round to the start.

Here is the program:

init: let dirs = %10000000          'sets pin 7 as the output (buzzer)

main: if pin0 = 0 then alarm        'if the door is opened go to the sub-procedure alarm
          if pin1 = 0 then alarm        'if the window is opened go to the sub-procedure alarm
          if pin2 = 0 then alarm        'if the door mat is stepped on go to the sub-procedure alarm
          goto main                           'go back to the start and test the inputs again.

alarm: high 7                               'buzzer on
           pause 500                         'wait half a second
           low 7                                'buzzer off
           pause 500                         'wait half a second
           if pin3 = 0 then alarm      'test the reset switch, if it is not pressed then continue sounding the alarm
           return   /   goto main        'return to the main program.

Usnig Inputs

The next thing we need to learn about is how to use inputs in microprocessor control.

In real life there are a variety of different inputs we could test - switches, temperature sensors, light sensors, strain gauges (to measure how much something has been bent) etc.  In class we are going to start by using simple switches:


Using the connections given we can only use pins 0-3 without adding any extra wiring.

Now that we are dealing with both inputs and outputs we have to make sure we set up the DDR (Data Direction Register) correctly:

init: let dirs = %11110000     'Sets pins 7, 6, 5, 4 as outputs, and 3, 2, 1, 0 as inputs

To "test" an input, we must ask about its state, i.e. whether it is on or off.  In a flowchart we must do this using a rhombus box.  Each question must be YES/NO.

Here is a flowchart using inputs, for a toy train which should travel along the track until it reaches the end.  This system uses a start switch (pin 0) and an "end switch" (pin 1) as its inputs and a motor (pin 7) to drive the train.


This can be turned into a PBASIC program using "IF . . . THEN . . . "

init: let dirs = %11000000     'Sets pins 7 and 6 as outputs, and 5, 4, 3, 2, 1, 0 as inputs

main: if pin0 = 1 then train    'tests the start switch
          goto main                     'if the start switch is not pressed, go back to main

train: high 7                            'switches on the motor
         if pin1 = 0 then train     'tests to check if the motor has reached the end of the track
         low 7                             'switches off the motor.
     
         end

If the IF . . . THEN . . . statement is true, it will go to the label stated.  (following the then MUST be a label - another part of the program to go to).  If the statement is not true, it will skip to the next line of the program.  You can ask if the pin is '1' or '0' depending on what your flowchart says.

Microcontroller

First we looked at the architecture of a microprocessor:

ALU: Arithmetic Logic Unit: The "brain" of the microprocessor, reads the program and carries out the mathematical calculations necessary.
ROM: Read Only Memory - where the program is stored.  The type of ROM we are using is Electronically Erasable Programmable Read Only Memory, which means that to reprogram the microprocessor, all we have to do is connect is back to the computer and write over the old program with a new one.  Other chips may be once use only, meaning that if you make a mistake, or need to change a part of your program, you need to get a brand new chip.
RAM: Random Access Memory.  This is memory the microprocessor uses whilst the program is running.  The parts of the RAM are called b0 - b13.  You can ask it to remember any number, add and subtract, or count how many times a part of the program has been repeated.
Clock / Program Counter / Timers: Controls the speed of the mathematical calculations
I/O Ports: Connect the microprocessor to the real world so that we can control outputs and test inputs
Buses: Groups of wires which transport information from one part of the microcontroller to another.

Then we looked at the "Stamp Controller" we will be using for our programming.


To be able to use outputs with the Stamp Controller, we needed to add an output driver to boost the current from the microprocessor enough to drive output transducers like buzzers, motors and lamps.


There are two types of output driver.  The Darlington Pair at the top, which is used to drive anything which requires on/off control - lamps, buzzers; and the Push Pull driver at the bottom which is used to drive motors so that they can turn in both directions.  This means that a buzzer needs to be connected to one output pin, and a motor to two output pins - one to make it go forwards and one to make it go backwards.


Thursday, 19 April 2012

Today we looked at pnuematics Revision. The one we did is under January.  Here is another examlple circuit to answer questions on:


1. Give the full name of all the valves/components.
2. What function do the three highlighted sub-systems perform?
3. Describe the operation of the circuit.
4. If the double acting cylinder has a diameter of 30mm and a rod diameter of 5mm; and the supplied air pressure is 5N/mm, calculate:
      a) The outstroke force
      b) The instroke force

Tuesday, 13 March 2012

Transistors, Inputs and Outputs

As mentioned before transistors are used as transducer drivers.

Lets consider some systems.

An automatic street lamp will come on at night when the light level gets too low.
We can draw a systems diagram:


We know how to make a light sensor using a voltage divider with a LDR.
As the light level decreases the resistance of an LDR increases, and so the voltage dropped over it will increase.  This means that there will be a higher voltage signal in the dark if the LDR is at the bottom of the voltage divider.


Using a variable resistor as the top resistor will give you flexibility in the light level required to switch on the lamp.

The signal voltage produced by the light sensor will depend on the light level - this is the signal to the transducer driver (as in the system diagram) so next we have to add the transistor.


We can then lastly add the lamp.


This is how to take a system diagram to a circuit diagram.

Some output transducers need a bigger voltage or current than the transistor/sensing circuit can provide.  For this we need to use a relay - just as we did in the telescope project to make the motor turn because the Alphaboard circuit provided 5V and the motor required 12V.


This page in your notes (P39) shows the relay as a magnetic switch. This means that there is no physical connection between circuits with different power supplies, a magnet pulls a switch closed to complete a higher power circuit.

When a relay switches it creates a large ElectoMagnetic Force (EMF) which creates a very large current.  If this flows back into the transistor it will destroy it and your circuit wouldn't work. Therefore we have to add a diode over the relay to stop the back EMF destroying the transistor.


So our street lamp may require a bigger supply voltage than the sensing circuit.  So we can add a relay in to ensure the lamp lights brightly.


Note the diode.  It protects the transistor from back EMF as the relay switches.

Motors often need greater current/voltage to turn them, so we can use a relay:


This circuit uses a light sensor as its input made using a voltage divider with a LDR at the top and a variable resistor at the bottom.  So as the light level increases the resistance of the LDR will decrease, decreasing the voltage dropped over it, therefore increasing the voltage dropped over the variable resistor and the voltage out of the voltage divider.  When the voltage between the base and emitter (VBE) is 0.7v the transistor will saturate, allowing current to flow from the collector to the emitter, energizing the relay.  This will pull the switch closed in the motor circuit and the motor will turn.
Note that the motor circuit is connected using only one leg of the relay switch, so that when the relay is not energized nothing will happen.

However using the Single Pole double throw relay above only allows the motor to turn in one direction.  We can use a Double Pole Double Throw relay to allow the motor to turn in both directions: one when it is dark and one when it is light:


Combined Circuits

We have looked at series circuits and we have looked at parallel circuits, so now we must consider circuits which have elements of both.

You need to remember all the rules for each type of circuit:

In a series circuit the total of all the voltages dropped in the circuit must equal the supply.
In a parallel circuit the voltage dropped in each branch is the same.

In a series circuit the current is the same at all points.
In a parallel circuit the currents in each branch are added to give the total circuit current OR from Kirchoff's law, the current entering a node must equal the currents exiting a node.

In a series circuits all the resistances are added to give the total resistance.
In a parallel circuit the reciprocal  (1/Ω) are added, or if there are only two resistors in parallel the special total resistance formula can be used: Rt = Product/Sum.

Lets consider this circuit.


To work out where the series and parallel parts are follow your finger around the circuit.  When you reach a node (junction/join) you know that you have come to a parallel branch.

First you should work out the equivalent resistance of the parallel resistors.  This, put simply, is finding out what resistance value these two have created, or working out the single value of resistor which could replace these two.


This makes it easier to see that these two parts of the circuit are in series with each other, so we can then work out the total resistance:


Knowing the total resistance we can find the total circuit current:


So going back to the circuit as it was, we can see that the circuit current flows through R1, and it then splits.


So we can work out the voltage dropped over R1 and from that work out the voltage dropped over the parallel branches (remember that this will be the same voltage in each branch):


Knowing the voltage dropped over each of the parallel resistors and the resistance, we can work out the current using ohm's law.


And finally we can check if our current calculations are correct using Kirchoff's Law.

Power in Electrical Ciruits

Power is the rate at which an electrical circuit transfers electrical energy to another form - i.e. if we had a bulb it would be the rate at which electrical energy is transferred to heat and light energy.  It is dependent on the voltage and current flowing in the circuit.

Power is measured in watts.

Joule's law states that

P = IV 

where P = Power (W) I = Current (A) and V = Voltage (V)

We may not know current in our circuit, but instead we might know the resistance.  So we can combine this law, and Ohm's law to make different permutations of the same formula:

P = IV,  and V = IR  so P = I x I x R   so we can use the formula P = I2R

P = IV and I = V/R so P = V/R x V   so we can use the formula P = V2/R

Lets consider these circuits:


Voltage Dividers

Today we looked at how we can use two resistors in series to change a signal voltage.

We know from previous lessons that the voltage in a series circuit is shared between the components.  We can use a special type of series circuit to get a specific voltage.

For example if both resistors are of the same value then the voltage will be shared equally between them:

If one resistor is twice as big as the other, twice as much voltage will be dropped over it:


Remember that the whole supply voltage must be used in the circuit, there is none left over at the end!

We can work out the proportion of the voltage dropped over the bottom resistor using the equation:

              R2      
V2 = R1 + R2      x Vcc   (V2 might also be called Vo for Voltage Out of the voltage divider)
             20     
      = 10 + 20      x 12
         2
      = 3     x 12
      = 8v

In voltage dividers we are interested in the voltage dropped over the bottom resistor.  We can use this voltage as a signal to another part of the circuit.  However it is possible to use the equation to work out the voltage dropped over the top resistor by changing the equation so that instead of R2 on the top, it is R1

The application of voltage dividers is most useful when using input transducers like a thermistor, which changes resistance based on temperature, and a LDR, which changes resistance as the light level changes.  This change in resistance will result in a change of voltage.

Thermistors
First of all we will look at thermistors.  The resistance of a thermistor changes with temperature.  They are negative temperature coefficient (NTC) which means that the resistance will do the opposite of the temperature - i.e. as the temperature increases the resistance will decrease and as the temperature decreases the resistance will increase.

Consider these circuits:


The thermistor is the bottom resistor in a voltage divider.  As the temperature decreases, the resistance of the thermistor will increase.  Therefore the share of the supply voltage dropped over the thermistor will increase (remember the more resistance there is, the more voltage is required) and so the output voltage will increase.  This makes this circuit a cold sensor.

The thermistor is now at the top of the voltage divider.  The properties of the thermistor remain the same (temperature up > resistance down) but because it is now at the top of the voltage divider, the circuit will act as a heat sensor.  As the temperature increases the resistance of the thermistor decreases.  Therefore the share of the voltage dropped over the thermistor will decrease and so the share of the voltage dropped over the fixed resistor must increase and so the output voltage will increase as the temperature increases.

There are different types of thermistor with various temperature ranges.  They are all found on this graph:

This is a "log graph" as in reality the properties of the thermistor will form a curve and not a straight line which is very difficult to read.  So instead this type of graph is used and the axis need to be interpreted.  The temperature axis acts as you would expect and the only difference is the spacing.  The resistance axis, however, is more difficult and this is the bit people get stuck with.  Reading up from the bottom the units read > 10, 20, 30 etc then 100, 200, 300 etc, then 1000, 2000, 3000 etc. 

It is also important to note that the values nearer the top are closer together than those at the bottom.  So a half way point is not half way between the two values, but closer to 1/3 of the value.  i.e. between 1k and 2k, half way would be 1.3k.

To find a value, read along the axis of the value you know (you could be given either the temperature and asked to find the resistance, or the resistance and be asked to find the temperature)  This graph shows that at 25°c the resistance of a type 4 resistor is 50kΩ.
 LDR - Light Dependent Resistor
The light dependent resistor will change resistance as the light level changes.  As the light level increases, the resistance decreases and as the light level decreases, the resistance increases.  LDRs can be used in the same way as thermistors in a voltage divider circuit.

Consider these circuits:

This is a dark sensor - as the light level decreases the resistance of the LDR increases and therefore the voltage dropped over the LDR increases and the voltage out of the voltage divider increases.

This is a light sensor - as the light level increases the resistance of the LDR decreases and therefore the voltage dropped over the LDR decreases so the voltage over the fixed resistor increases and the voltage out of the voltage divider increases.

Just like thermistors there is a graph to show the change of resistance with the change in light level.  This is another log graph so you need to be aware of the axis.  We only need to look at one type of LDR, the ORP12.  You need to be aware that in this graph, the resistance is measured in KΩ.


This graph shows how to read the graph - at a light level of 200 lux the resistance is 600Ω.

It may be necessary to adjust the sensitivity of the circuit, i.e. change the "trigger" temperature or light level.  In this example a signal voltage of 5v is required.  First of all we can use the variable resistor to achieve this voltage at a temperature of 0°c.

We can adjust the temperature which produces that 5v signal voltage to 20°c by changing the resistance of the variable resistor.